How To Connect Snowflake With Power BI?
The process to establish a connection of Snowflake to Power BI is simple when we use Azure Data Directory. But, before getting into the making of connections, let’s talk a bit about Snowflake.
Snowflake is a powerful data mobilising platform to harness the power of data by all means, utilising cloud data servers. It enables users to gain new actionable data insights, create superior business opportunities, and better understand their audience or customers for a better user experience with maximum ROI.
As per Forrester’s Total Economic Impact study, businesses have claimed growth in ROI of 612% in three years of using Snowflake.
Snowflake can let you access your structured as well as unstructured data anywhere and anytime through the cloud or external servers. Like Microsoft, it manages all kinds of updates, upgrades, and maintenance for smooth operations and impactful administration. Businesses can scale operations more easily with multi-cluster data architecture.
What Snowflake can do with Power BI?
The best part of data cloud is managing critical workloads even during peak times while unifying customers, partners, and suppliers. The integration of Snowflake to Power BI makes the visual analysis of data more powerful and up-to-date. Snowflake’s rich metadata makes data analyses and explorations more intelligent and intelligent, regardless of whether the data is structured or unstructured.
Snowflakes is powered by a powerful SQL-92 engine that can handle a wide range of complex operations and queries with ease. It is so powerful, for example, that it can read and write at twice the speed of other comparable SaaS and NoSQL solutions.
Even at the most basic level, the engine is optimised for maximum performance while utilising minimal resources and streaming capabilities. It also makes use of server-side paging to provide a quick response whenever a query is received.
After the integration, it makes it possible for MS Power BI to analyse data on different standards, including numbers, location, custom text, data, time, and much more. Based on such parameters, Power BI will build more interactive and user-friendly data visuals utilising charts and graphs.

How to build a Connection to Snowflake to Power BI Service?
To establish a connection, we will need to avail ourselves of Azure Active Directory (Azure AD) and administrative access to Power BI, Snowflake, and Azure. At first, we need to enable SSO (single sign-on) using Power BI Admin, and the steps are discussed below:
The below steps should be followed by the master administrator of Power BI.
- First, sign in to Power BI with the necessary credentials.
- Once you successfully log in to your account, you need to click on the “Settings” button available on the header menu.
- The drop-down menu will open some options, among which you need to select Admin Portal. A new screen will open where you will find different options to manage all of Power BI for your organization.
- Now, click on the Tenant Settings button available on the left. Scroll down the page below to select Integration Settings; refer to the below image.
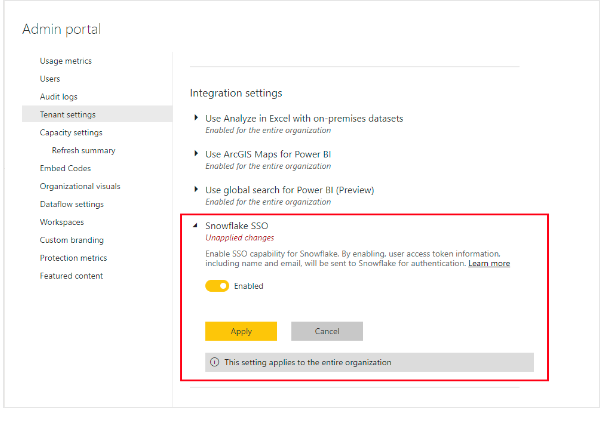
- Check the Enable option and select Apply button. It will take at least an hour to apply the recent changes. Once it is activated, you can start using reports with SSO.
Setting up Dataset with Azure AD
- After logging in to Power BI, select the desired workspace and click on Settings button available next to dataset name; see image below.
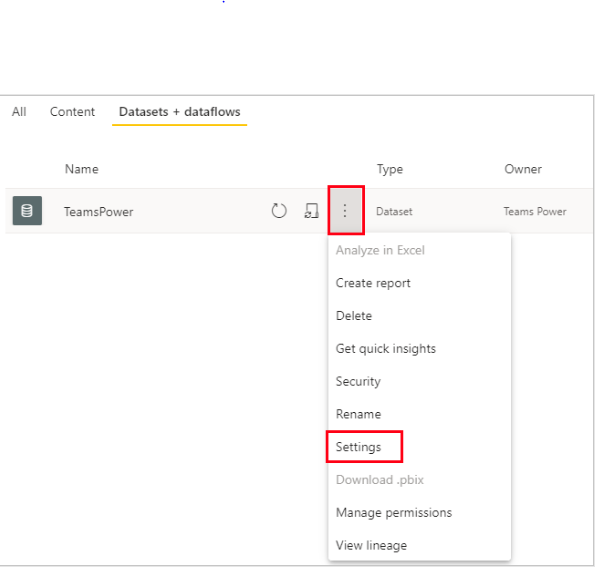
- Now, select the Data Source Credentials and sign in to Azure data services. Also, you can sign in to the same dataset using your Snowflake credentials.
- In Data Source Credentials, click on End users use their own OAuth2 credentials when accessing this data source via DirectQuery. It will also enable Azure SSO irrespective of the authentication type, whether basic or OAuth2 (refer to the below image).
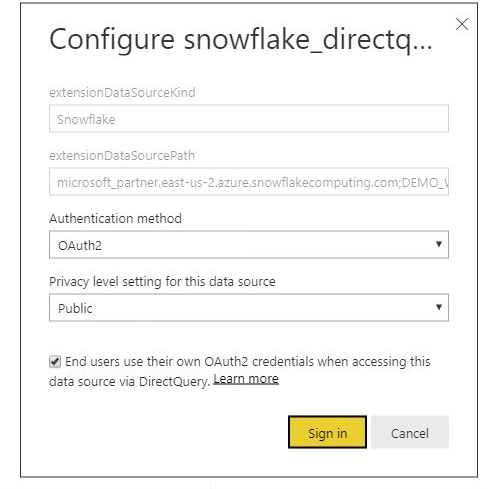
- Once you set the needed option, click on Sign In button. It will let the other Power BI users use Azure AD authentication to establish a connection with data from the Snowflake dataset.
How to Connect Snowflake Data Warehouse with Power BI?
- Open the Power BI Desktop dashboard and select the Get Data button from home menu. A new menu will be displayed.
- Click on the Database button from the left menu and select Snowflake option from right; refer to below image.

- Once you click on Connect button, a new window will appear where you need to enter Snowflake server details and the name of the computing warehouse (refer to the below image).
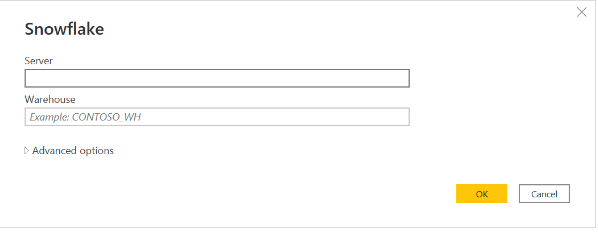
- Click on the OK button once you’ve entered the desired value in the empty boxes. You can also specify additional values in Advanced Options.
- Now, specify your Snowflake credentials to proceed and click on the Connect button. The data warehouse will be connected with Power BI.
How can Dynamics Square help you connect Snowflake with Power BI?
We have explained the entire process of connecting Snowflake from Power BI with simple steps. But, no one is aware of any unwanted issues. If you are having any issue establishing a connection, feel free to connect with the team at Dynamics Square. Our experts will resolve all your issues, whether they are related to Snowflake or Power BI, in the shortest time possible. As a Microsoft D365 certified consultant in the UK, we follow Microsoft’s methodology to resolve any errors. If you have any questions, please contact us at 0207 1932 502 or info@dynamicssquare.co.uk.
See Also –
.png)
Kapil Jangid is a Digital Marketing expert with an aim of uplifting businesses through cloud-based software as a service (SaaS). He has more than 8+ years of experience working with numerous SaaS companies, driving brand awareness, and enhancing revenue opportunities.